A year 7 user guide for...
Contents Page
- Accessing Email
- Send An Email
- Open An Email
- Add A Contact
- Attach A File To An Email
- Carbon Copy (CC)
- Make A Message 'Urgent'
1. Accessing Email
- From the Desktop, double click on the Internet icon.
- Type in "www.Google.com."
- Once on Google; search for "Office 365."
- Click on the link that says "Sign in to Office 365."
- Enter your e-mail address and password.
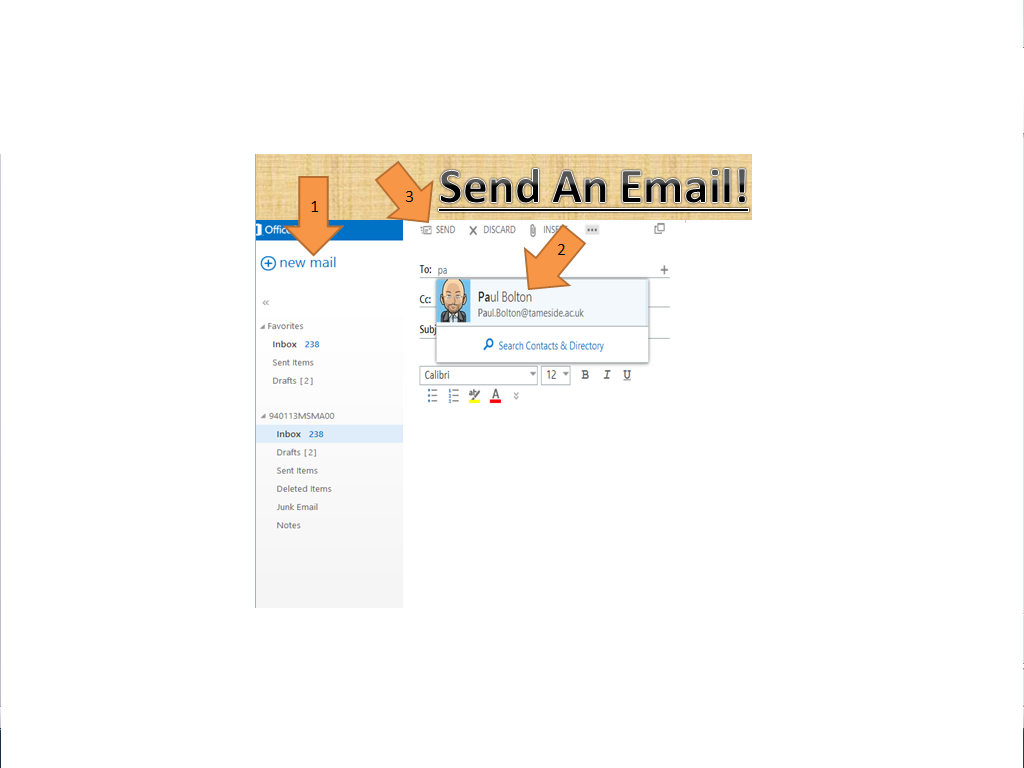
2. Send An Email

3. Open An Email
5. Attach A File To An Email
6. Cc (Carbon Copy)
7. Make A Message ‘Urgent’
Troubleshoot
If you have any problems when trying to use Office 365, inside or outside of college, ask your teacher for assistance or contact the IT help desk at: 0161 908 6680 or visit http://vle.tameside.ac.uk/itservices/helpsheets.php
- On the Outlook e-mail page, in the top left corner, click on "New Mail."
- On the right hand side where it says "To:" type in the e-mail address of the person you want to send it to. For example: Paul.Bolton@tameside.ac.uk.
- Underneath, on the blank white page, is where you type your e-mail.
- Also on the upper right hand side is where you will find the "send" button. Simply click the button and the e-mail will be sent.

3. Open An Email
- On the left hand side, of the e-mail page, click on the word "inbox" to open up your received e-mails.
- In the middle of the page is where your received e-mails are found.
- Click on which e-mail you want to read and it will automatically open on the right side of the page.
4. Add A Contact
- Click on the "People" button found in the top right hand corner of the e-mail page and a new page will open.
- Click on the "+New" button in the top left hand corner of the page.
- A box will appear with 3 different options, click on the top one labelled "create contact."
- At the top; enter the first and second name of the person you are adding, middle name is optional, e.g: Paul Bolton.
- In the middle of the page, in the first box called "E-mail", type in the e-mail address of the person you are adding, e.g: Paul.Bolton@tameside.ac.uk.
- The second box, called "Display as" will automatically fill, you can change this or keep it as it first appears.
- Once all that is done, click "save" at the top of the page and the contact will be added.
5. Attach A File To An Email
- Found on the right hand side of the page, click on "Insert" and a drop-box will appear.
- Click on the top option called "Attachment."
- This will bring up a box that contains all of your files, click on the one you want to attach and press the "open" button.
- This will attach the file to the e-mail. The file you have attached will appear underneath the word "subject."
- Click on the line that says "To:" and type in the e-mail address of a person you want to send an e-mail to.
- Click on the line that says "Cc:" and type in a different e-mail address, of someone on your contacts list, to create a Carbon Copy. This will send a copy of the e-mail to that person as well.
7. Make A Message ‘Urgent’
- In the upper right hand corner of the e-mail page, click on the 3 dots found next to "Insert" and a drop-box will appear.
- Hover your mouse over the option "Set Importance" and then click "High."
- This will bring up a red exclamation on the "Subject" line, showing that the e-mail is urgent.
Troubleshoot
If you have any problems when trying to use Office 365, inside or outside of college, ask your teacher for assistance or contact the IT help desk at: 0161 908 6680 or visit http://vle.tameside.ac.uk/itservices/helpsheets.php


No comments:
Post a Comment